I have been very busy over here at Lunden Designs HQ with lots of quilting, summer fun and designing a new website! So as of today, I will be blogging and posting from my very own URL www.lundendesigns.com. You can subscribe to the new blog, which has all of my old posts as well, at www.lundendesigns.com/blog.
Thank you so much for reading this blog and I hope you will update your reader with my new info. And feel free to let me know what you think of my new site and if there are any changes you think I should make.
Tuesday, August 30, 2011
Wednesday, June 29, 2011
My first picnic
We have been enjoying outdoor concerts this summer, especially in the evenings. It is a great time to spend with friends and family and a little extra playground time is always a plus. It is also a great excuse to use my new picnic quilt.
I cut the striped print on the bias for the binding and then sewed it with my machine instead of by hand. It makes me a little crazy to do it now that I am hooked on hand sewn bindings but I needed the binding to go on fast and to be nice and secure.


And here are some close ups of the quilting, which I did on my new-to-me long arm machine! This is my first quilt that I quilted on the long arm so there is some extra special excitement about it.


The big secret I have been keeping is that I bought a long arm quilting machine. It is not that I was intentionally keeping a secret as much as I have been too busy practicing to talk about the machine. I scored the machine on Craigslist - it is 20 years old and the bare bones Kenquilt model and it makes me so happy. I have a lot to learn and a lot of practicing to do but it is just so awesome.
Saturday, June 18, 2011
A Picnic Quilt
I have been collecting vintage sheets for a while now, with the idea that I could use them to make simple picnic quilts. I wanted to keep the piecing of the quilt tops simple enough that it wouldn't make me too anxious to actually use them.
This quilt is big - 75" x 75", made up of 25 15" blocks. This quilt is perfect for lying on the beach and has plenty of room for a lot of friends, but it is really big. Next time, I will definitely make the blocks smaller so the finished quilt is closer to 60" square. That seems a more manageable size.

After I bind it, I am going to play around with making a carrier for it that involves velcro and a shoulder strap.
The yellows in the prints came out a little muted. Once this baby is finished, I will do a proper photo shoot outside.
Monday, May 30, 2011
A Market Bag Tutorial
Happy Memorial Day! I hope everyone is enjoying themselves as summer kicks off. I have a tutorial over at Fabricworm on how to make this bag of you are interested. Here is the link.

Happy Sewing!

Happy Sewing!
Sunday, May 29, 2011
Two For the Road
Some good friends had twins two months ago so it was my pleasure to make them two little quilts. I had one finished before they were born but I got busy sewing up samples for Birch's booth at Quilt Market, so the other one had to wait a bit. I finally finished the second one up and then it only took me ten days to get in the mail. Yikes!
This one is made with my favorite scraps and a lovely pale pink solid.
 The back is a vintage sheet I found the day before I was going to quilt this with a solid cream. I have nothing against a solid background but the stripes and the pink worked perfectly.
 This quilt is made up of a candy bar of City Weekend prints. My local fabric shop sold it to me individually after many harassing visits : ) The blue floral print was from my stash and picked up in Mexico.
 I kept the back simple on this one with a solid Kona Ivory.
 Even though I made the quilts with different designs, I did want to have one thing unifying between them so I bound each one with the same pink floral.
The best part of the whole process is that I already received some action shots of the girls modeling with their new quilts. You are supposed to give a gift without strings, but I am going to admit that I really give them to get action shots of the babies.
Monday, May 09, 2011
And the winner is...
Skooks! Thank you all for the super sweet comments! I wish I had enough copies for everyone.
Tuesday, April 26, 2011
Exciting News and A Give Away!
I am so excited that three of my patterns are included in new 101 Patchwork and Quilts Projects magazine. The magazine is awesome and full of so many great projects. Just flipping through it is so inspiring.
 Here are two of my three pillow projects. I made these pillows for Birch Fabrics for their booth at Quilt Market in the Fall.
 And here is my third pillow. It was also made from Birch Fabrics to show off their line Marine fabrics.
 Since this is such a cool magazine and such a fun opportunity, I want to give away a copy. Please leave a comment and I will pick a winner randomly on May 8.
Good luck!
Thursday, April 07, 2011
Some New Purses
I have been so obsessed with quilting lately that I have really neglected my first love, purses. Every once in a while, I will force myself to stop quilt to whip a purse or two. A friend's birthday is always a good excuse, especially when this friend delivered food to my doorstep in the pouring rain right after my baby was born. Yeah, that kind of friend deserves a new purse.
I made this little cutie the day of the birthday celebration. The exterior fabric was picked up in Mexico a couple of years ago and the lining is from a fat quarter stack from Purl Soho. The strap is made from brown ultra-suede for durability.

 Since I have sewn so many purses, it makes for a really nice, productive afternoon because I can just go into auto-pilot. I even managed to make myself a new purse while I was at it. My last one was so great but it had a lot of love and really needed to be retired. Carrying around a stained, old purse doesn't really speak well for my sewing abilities.
And I even allowed myself to use some of my favorite fabric. This Echino print is so fun and whimsical with the little purple beetle. It is a perfect everyday print.
 I kept the style nice and small with a zipper closure. I need to be able to just tuck the essentials under my arm and be ready to chase after a toddler at a moment's notice.
 Speaking of a certain toddler, my little one now makes me stop in front of the grocery store to dance to the music playing over the loud speakers. We do this on our way to the gym in the mornings. It is seriously the very best part of my day.
Sunday, April 03, 2011
40 yards
I am now the proud owner of 40 yards of 90" batting! I bought it from Joann's with a 40% off coupon. I buy so much batting that it finally made sense. It is really a commitment to quilting.


Magnolia Garden Quilt and Tutorial
Here is my most recent quilt and tutorial. You can find the tutorial over at fabricworm.
 And here is the back.
 I have some other baby quilts in the works but I have to get them mailed off before I can do the big blog reveal, not that the new parents of twins are checking my blog, now that I think of it.
 And here is the back.
 I have some other baby quilts in the works but I have to get them mailed off before I can do the big blog reveal, not that the new parents of twins are checking my blog, now that I think of it.
Friday, February 04, 2011
Five Points Quilt Tutorial
So my exciting news is that I made a second quilt and drafted a tutorial for it over at fabricworm. Click on over if you want to check it out.


Sunday, January 30, 2011
The big reveal!
This quilt is happily in the arms of its new owner, and it seems like just in time since new York City is getting record snow fall this winter. From what I have heard, the quilt is already getting lots of cuddling time.
 I had just enough fabric left to piece a strip on the back.
 And here a closeup. I was going for a cute baby/quilt portrait but it turns out that is physically impossible to get a 15 month old to sit still and look at the camera at the same time. I think I will try bribery next time.

Also, there is some exciting news related to this quilt but I need to wait a few more days before spilling the beans.
 I had just enough fabric left to piece a strip on the back.
 And here a closeup. I was going for a cute baby/quilt portrait but it turns out that is physically impossible to get a 15 month old to sit still and look at the camera at the same time. I think I will try bribery next time.
Also, there is some exciting news related to this quilt but I need to wait a few more days before spilling the beans.
Sunday, January 09, 2011
The beginnings of another quilt
This quilt is a surprise birthday gift for a very dear friend. I only have a couple of weeks to get it done but the design isn't too complicated. I don't want to get too detailed about the design just in case the birthday happens to check this blog but hopefully the grand reveal won't be too far off.
 These grays, oranges and yellows have been singing to me for a while so I really can't wait to get this baby put together. They all came from Fabricworm. It was soooooo much fun getting to pick them out (with Arlene's help).
 I'll keep you posted!
 These grays, oranges and yellows have been singing to me for a while so I really can't wait to get this baby put together. They all came from Fabricworm. It was soooooo much fun getting to pick them out (with Arlene's help).
 I'll keep you posted!
Saturday, January 08, 2011
2010 Projects
Since there is no way I would be able to find the time to get individual posts for all the projects I did during the last couple of months of 2010, here is one big, mega post of projects galore.
Here is a sample apron I made for a sewing class that I offered at Birch Fabrics.
 Here is a sample skirt for another sewing class I taught at Birch.
 Here is a quilt I made as a thank you present for our friend who let my husband stay with him for both of his trips back to NYC. Being nice enough to have a friend crash in your studio twice warrants a quilt. And maybe some matching throw pillows...
 In honor of all the teething going on around Halloween, it only seemed fitting that Lila dress up as a vampire. I made her a little cape, a stuffed bat and appliqued some "blood" drops on her tunic.
 I made this lovely dress and jacket and blogged about it over here.
 I made this tote with a matching mini-purse for a friend's birthday.

 I made us all new stockings based on the pattern and tutorial I created here.
 I made this little cutie and blogged about it here.
 And finally, one of the many sets of pot holders I made for holiday presents.

Sadly, I didn't photograph most of my holiday presents because I was too busy sewing and mailing. They were all super cute, but you will just have to take my word on it.
So goodbye 2010 and hello 2011, a year of crafting and blogging!
Here is a sample apron I made for a sewing class that I offered at Birch Fabrics.
 Here is a sample skirt for another sewing class I taught at Birch.
 Here is a quilt I made as a thank you present for our friend who let my husband stay with him for both of his trips back to NYC. Being nice enough to have a friend crash in your studio twice warrants a quilt. And maybe some matching throw pillows...
 In honor of all the teething going on around Halloween, it only seemed fitting that Lila dress up as a vampire. I made her a little cape, a stuffed bat and appliqued some "blood" drops on her tunic.
 I made this lovely dress and jacket and blogged about it over here.
 I made this tote with a matching mini-purse for a friend's birthday.
 I made us all new stockings based on the pattern and tutorial I created here.
 I made this little cutie and blogged about it here.
 And finally, one of the many sets of pot holders I made for holiday presents.
Sadly, I didn't photograph most of my holiday presents because I was too busy sewing and mailing. They were all super cute, but you will just have to take my word on it.
So goodbye 2010 and hello 2011, a year of crafting and blogging!
Hello 2011!
I can't believe it has been so long since my last blog post here. So so sorry - excuses, excuses, blah blah blah. My goal for 2011 is to get back into posting about my projects. Things are so busy around here with a toddler that just getting time to sew has been tough enough. Actually blogging about the projects too would have been a miracle.
Here is my first quilt for 2011. I have FIVE babies coming in the next few months so I figured the lull after the holidays would be a perfect time to get a jump start on making some presents. The new line of Dr. Seuss prints are so freakin' cute that I had to add them to my stash. Luckily, so many of my friends decided to have babies so I was never at a loss for what to do with the fabric.
 Since the prints are pretty busy, I decided to keep my piecing simple. I also kept the back simple too. Everyone's eyes are going to need a break from those wild prints.

I had fun with the quilting and used Guetterman's painted yellow thread. The change in colors adds a little fun to the quilting, especially on the back side.
 I can't wait to get this one in the mail and off to the soon-to-be-new parents.
Here is my first quilt for 2011. I have FIVE babies coming in the next few months so I figured the lull after the holidays would be a perfect time to get a jump start on making some presents. The new line of Dr. Seuss prints are so freakin' cute that I had to add them to my stash. Luckily, so many of my friends decided to have babies so I was never at a loss for what to do with the fabric.
 Since the prints are pretty busy, I decided to keep my piecing simple. I also kept the back simple too. Everyone's eyes are going to need a break from those wild prints.
I had fun with the quilting and used Guetterman's painted yellow thread. The change in colors adds a little fun to the quilting, especially on the back side.
 I can't wait to get this one in the mail and off to the soon-to-be-new parents.
Friday, October 29, 2010
Finally!
I am proud to show of my latest quilt. It has been months in the making and I am so happy that it is finally finished. It is made from vintage sheets from my stash and from an awesome vintage sheet swap I participated in on Flickr. Thank you ladies!
 Instead of going for a quick and easy design, I decided to push myself by doing a quilt top with more intricate blocks. The blocks took for-ev-er! I finally got around to sashing the blocks and then made the decision to have it sent to a long arm quilter rather than trying to quilt it myself.

The quilting is gorgeous but my only regret is that my favorite part of the quilting design is in the blocks and it gets a little lost with the intricacy of the block pattern and prints. It isn't until the quilt is turned over that the quilting really shines through.
 Man, photographing quilts is tough but this picture seems to capture the quilting best.
 The quilt is in the dryer now and will be on my bed by tonight. Whoop whoop!
 Instead of going for a quick and easy design, I decided to push myself by doing a quilt top with more intricate blocks. The blocks took for-ev-er! I finally got around to sashing the blocks and then made the decision to have it sent to a long arm quilter rather than trying to quilt it myself.
The quilting is gorgeous but my only regret is that my favorite part of the quilting design is in the blocks and it gets a little lost with the intricacy of the block pattern and prints. It isn't until the quilt is turned over that the quilting really shines through.
 Man, photographing quilts is tough but this picture seems to capture the quilting best.
 The quilt is in the dryer now and will be on my bed by tonight. Whoop whoop!
Sunday, September 19, 2010
Thank you gifts
I bought some insulated batting on sale at Joann's over Thanksgiving in 2008 and finally opened it up. Needless to say, it was a loooooong overdue project. I spent a weekend at a friend's family's house a couple of weeks ago and needed a thank you present that could fit in my carry-on luggage. I whipped up these oven mitts and pot holders (also finally breaking into the Lizzy Dish fat quarter stash) and they were a huge hit.
 I used some pre-made binding I had left over from other projects for the borders and to make little loops. I will definitely be making more of these for holiday presents.

 I used some pre-made binding I had left over from other projects for the borders and to make little loops. I will definitely be making more of these for holiday presents.
It has been a while...
So sorry to be gone for so long - my only excuse is that I have a 10 1/2 month old who is a girl on the go so my free time is very limited. Luckily, I have been able to get some sewing done and have even done a little guest blogging over at Fabricworm.
Here is a sample I made for the Tunic sewing class I am teaching in a couple of weeks.
 And here is a little halter tunic I made from a free pattern on www.sewingpatterns.com. I blogged about it here.
 I also wrote a post on how to make a messenger bag without a pattern here.

Here is a sample I made for the Tunic sewing class I am teaching in a couple of weeks.
 And here is a little halter tunic I made from a free pattern on www.sewingpatterns.com. I blogged about it here.
 I also wrote a post on how to make a messenger bag without a pattern here.
Sunday, August 08, 2010
Sweet Little Bear

I am doing some guest posts over at Fabricworm.com. This guy is my first project so if you have a chance, check it out.
Tuesday, July 06, 2010
Sewing Lessons!
I have been a big fan of Fabricworm and Birch Fabrics since Cynthia first started selling fabric two years ago. It made my move back to Cali even more exciting because Birch's brick and mortar store was only a couple of towns away from where I live. Getting to see all of the fabrics in person is pretty amazing.
I was up at Birch a couple of weeks ago and one thing led to another and I am now going to teach some sewing classes in Birch's gorgeous loft space! It is so exciting I can barely think of anything else.
The first two classes I am going to teach are how to sew a zippered, lined cosmetics bag and how to sew a basic patchwork quilt. I wanted to make some samples to have in the store as a way of advertising the classes. I suggested this to Cynthia and the next thing I know, we are cruising around the store putting together the cutest fabric combination for the sample quilt. Okay, it was mostly Cynthia and I just followed her around and tried not to geek out in excitement.
The quilt is 36" square made up of 6 fat quarters with an extra 1/4 yard of fabric for the binding and just over a yard of fabric for the back. I wanted to keep the pattern simple and something that would be easy enough for beginners but would also be a way to teach basic patchwork skills. I also kept the quilting simple by outlining both sides of the seams with a white thread. I love how the quilting adds just a little extra to the brown squares.
The fabrics are Monaluna Woodland Chain Pool, Michael Miller Dumb Dot Chocolate, Riley Blake Colorful Cheery Circles Green, Alexander Henry 2D Zoo Pool, SEI Playday Playful Geos Teal, and Robert Kaufman Pure Organic Chocolate.
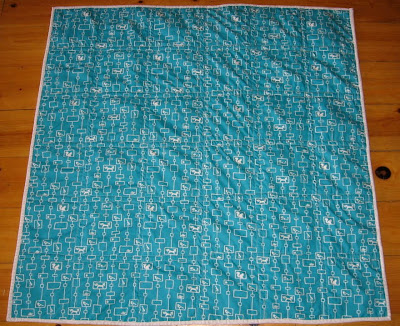
 And here is the back, Monaluna Woodland Chain Pool. The binding is Riley Blake Colorful Christmas Cheery Circles White.
 Here is the sample of the zippered cosmetics bag. I used Alexander Henry's Bird Seed and lined it with some Amy Butler Full Moon Polka Dots. It is lined and has an interior pocket.
 The classes start in August so if you live in the Central Coast of California and interested, shoot me an email.
I was up at Birch a couple of weeks ago and one thing led to another and I am now going to teach some sewing classes in Birch's gorgeous loft space! It is so exciting I can barely think of anything else.
The first two classes I am going to teach are how to sew a zippered, lined cosmetics bag and how to sew a basic patchwork quilt. I wanted to make some samples to have in the store as a way of advertising the classes. I suggested this to Cynthia and the next thing I know, we are cruising around the store putting together the cutest fabric combination for the sample quilt. Okay, it was mostly Cynthia and I just followed her around and tried not to geek out in excitement.
The quilt is 36" square made up of 6 fat quarters with an extra 1/4 yard of fabric for the binding and just over a yard of fabric for the back. I wanted to keep the pattern simple and something that would be easy enough for beginners but would also be a way to teach basic patchwork skills. I also kept the quilting simple by outlining both sides of the seams with a white thread. I love how the quilting adds just a little extra to the brown squares.
The fabrics are Monaluna Woodland Chain Pool, Michael Miller Dumb Dot Chocolate, Riley Blake Colorful Cheery Circles Green, Alexander Henry 2D Zoo Pool, SEI Playday Playful Geos Teal, and Robert Kaufman Pure Organic Chocolate.
 And here is the back, Monaluna Woodland Chain Pool. The binding is Riley Blake Colorful Christmas Cheery Circles White.
  Here is the sample of the zippered cosmetics bag. I used Alexander Henry's Bird Seed and lined it with some Amy Butler Full Moon Polka Dots. It is lined and has an interior pocket.
 The classes start in August so if you live in the Central Coast of California and interested, shoot me an email.
Subscribe to:
Posts (Atom)