Monday, March 30, 2009

Quilt Action Shots - VIII

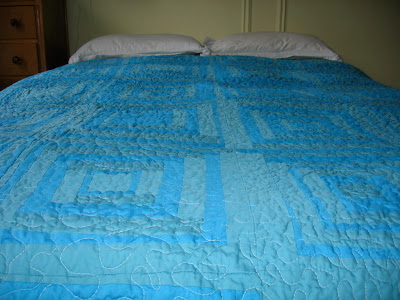
I received this pictures this morning and I can't stop cracking up. Here is the very cute couple modeling the Secret Wedding Quilt. What good gift recipients! They must know me really well because giving me actions shots is pretty much a guarantee that I will be making them more presents. Think of all the birthdays and anniversaries to come!

I even heard a rumor that new sheets and a new bed skirt were purchased to coordinate with the quilt. Hearing that actually made me tear up a bit. It makes me so happy to know that the quilt is loved and will be used. I think that is all any crafter ever wants to hear when they give a gift.

Enough waxing sentimental:

Love this "caught in a nap" shot!

And this one too! So cute!

And please let me assure you, the photographer kept things very PG by having a 19 month old toddler and a dog chaperon the shoot.

Wednesday, March 25, 2009

Baby Pants Action Shots

So Baby Julia is already hard at work, modeling all kinds of fun things. I made her these Crescent Moon Yoga Pants as part of her baby shower gift. It is so great to have a baby close by that can actually test drive some patterns for me and Baby Julia is certainly doing her part.
The pattern was a little confusing, especially since it only calls for two legs and a waist band but I managed to muddle through. I used my overlock machine to sew the legs together and to add on the waistband. I serged the bottoms of the pants and then used a double needle on my sewing machine to hem them.


As you can see, the new born size is still pretty big for this two month old. Julia's mom assured me that the high-waisted look is in with the new born crowd so the pants were fine until Julia grew into them. So sweet. But then again. Julia is so cute, she could rock a potato sack and look adorable.

I made two more pairs for some bigger kids and will see how the bigger versions work, but it looks like I could definitely make the waist band at least half the width to keep the band out of the baby's arm pits. I would also make the waist band a little longer since I found it hard to stretch the band to match up evenly with the pants. The material I used a stretch cotton jersey that I picked up from Joann's that has a lot of give, but it just wasn't quite enough to work with the legs. It might be different with a different jersey but I think the way to go is to cut the waist band a little longer next time and the see how it lines up. That way, I can always make it a little smaller.

Here is the little booty shot. (I know! I can't stand how cute she it either.) It is pretty clear that I could cut off at least an inch or two from the body of the pants and reduce the width of the waist band and these pants would fit a whole lot better.


Stay tuned for more modeling sessions with Julia...

Quilt Action Shots - VII

OMG! Are you ready for this? These are so cute, I can barely stand it. Here is Baby Julia hanging out on her quilt. Again, it is pictures like these that drive me to make baby quilts. My heart melts and my ovaries explode just looking at these pictures.

She is so cute you don't even notice the quilt.

Wednesday, March 11, 2009

Secret Wedding Quilt - Part 4

Here it is, all washed and ready to get sent out tomorrow. I love how it turned out and can't wait for the happy couple to get it in the mail.

The fabric has a faint sheen to it so it doesn't photograph as clearly as I had hoped.


Here are some close up shots of some of the blocks and the quilting.


Here is the back. I love the yellow and orange and how the blue binding looks against the bright colors. It is all sunshine and happiness and can definitely be flipped over if they want a little variety.

Here is one more close up of the blocks on the backside and the binding.

Since both my brother-in-law and his fiance are both super cute, maybe I can persuade them to take some actions for the blog. : )

Monday, March 09, 2009

Too Much Country? Not Enough Rock 'n Roll?

I bought a stack of Denyse Schmidt's Katie Jump Rope fabric months ago on a whim but without a plan in mind. The prints aren't my usual style but I was so attracted to them that I broke down and bought them regardless. I finally saw a quilt in a blog posting about a Teen Vogue photo shoot of all things and decided to use the fat quarter stack along with some fabric from my stash and scrap bag to supplement and to make sure it wasn't too matchy-matchy and to make it a little less country. I am not so sure I was successful.

Because my inspiration came from a picture, I didn't have a good idea on how to approach making the quit top. I kicked around some ideas with a very wise quilter but ended up just plowing forward with my fingers crossed. I tried to map out the pieces on paper first to figure out how to do the ends but ended up cutting the full sized trapezoids first. After roughly figuring out how many trapazoids I needed to sew to make a 90 inch row, I got busy. I ended up using my ruler and rotary cutter on both ends and cutting straight edges, rather than trying to piece the smaller strips. Lazy and wastful but so much faster ; )

I added 1 and 7/8 inch stripes of navy blue in between the chevrons to break up the prints. I love how it looks. I keep thinking that this style would look so good with solids from the same family or a collection of more modern fabrics. (But that it is really my fault for picking fabrics that aren't really my style even though they are super cute.) Pale yellow, pale gray, pale blue and white could make for a gorgeous gender neutral baby quilt.


And here is a close up.

Now I just need to pick up some batting and get this baby quilted. It will be nice to mix up the quilts that I have on my bed now that spring is here and the big down duvet comforter will be going in to storage. And if I can't get over it, at least it will be a great quilt for houseguests.

Good thing I already have another quilt for our house in the queue.

Tuesday, March 03, 2009

Secret Wedding Quilt - Part 3

So here is the wedding quilt. I finished the quilting yesterday and now just have to make the binding. I can't believe that I am in the home stretch. It took a lot of time to make all of the blocks but once that was done, things really started moving.

Here is a close up of some of the blocks - they are wonky log cabins. I tried to keep a balance of size and color but didn't worry too much about it. All of the blocks were improvised.

Here is the back. Although I didn't need to, I added the orange stripe to break up the orange and to make it reversible.
Here is a close up of the three little blocks I added to the back. There was a brief moment when I considered making more, but then I reined in that insanity and moved on to the fun part - free motion quilting.
The next round of pictures will be of the finished quilt, which should hopefully be done this week. I can't wait to see how it looks after getting washed. Good thing I have another quilt in the queue so I am not tempted to keep this one for myself.

Monday, March 02, 2009

The Secret Wedding Quilt, Part 2

I was really worried that this quilt would become my great white whale, especially after how I left things last time. The first thing I did was take a break. I was getting frustrated with how the blocks weren't lying flat and the time apart was just what I needed. I realized that I was making mistake with the first round of blocks by not using my rotary cutter to make a straight edge as I built each side of the log cabin. Once I started doing that, the blocks looked so much better.

After I finished all of the blocks, I ironed the hell out of the first round of blocks and only had to redo a couple to get them to lie as flat as possible. I also knew that I could have a little puffiness and still be okay because I was planning on stippling the quilt so some of the puckers would be hidden in the quilting.

This is the biggest quilt I have ever made. It is a queen size - 90 inches by 90 inches. I know! It is humongous but the happy couple is worth it. To pin the three layers together, I tried an idea I read about online that involves taping the layers to the floor. Sadly, I have to move my sofa to clear a space in my apartment. Who knew that 7 1/2 square feet was so hard to find?

Here is the back taped to the floor. I pieced the back with a couple of mini blocks to make it a little more interesting.


And here is the finished quilt top taped down over the batting and the back. The lighting isn't great in my living room and the material has a slight sheen to it so this isn't the clearest picture but... I just couldn't resist posting pics now.

I spent the afternoon quilting it and finally finished it in time to go to the gym. Unfortunately, quilting all day can wear a gal out and I mostly did a lot of lying around on the mats. I will take more pictures tomorrow of the quilting when I have better light.