Friday, October 29, 2010

Finally!

I am proud to show of my latest quilt. It has been months in the making and I am so happy that it is finally finished. It is made from vintage sheets from my stash and from an awesome vintage sheet swap I participated in on Flickr. Thank you ladies!

Instead of going for a quick and easy design, I decided to push myself by doing a quilt top with more intricate blocks. The blocks took for-ev-er! I finally got around to sashing the blocks and then made the decision to have it sent to a long arm quilter rather than trying to quilt it myself.


The quilting is gorgeous but my only regret is that my favorite part of the quilting design is in the blocks and it gets a little lost with the intricacy of the block pattern and prints. It isn't until the quilt is turned over that the quilting really shines through.

Man, photographing quilts is tough but this picture seems to capture the quilting best.

The quilt is in the dryer now and will be on my bed by tonight. Whoop whoop!

Sunday, September 19, 2010

Thank you gifts

I bought some insulated batting on sale at Joann's over Thanksgiving in 2008 and finally opened it up. Needless to say, it was a loooooong overdue project. I spent a weekend at a friend's family's house a couple of weeks ago and needed a thank you present that could fit in my carry-on luggage. I whipped up these oven mitts and pot holders (also finally breaking into the Lizzy Dish fat quarter stash) and they were a huge hit.

I used some pre-made binding I had left over from other projects for the borders and to make little loops. I will definitely be making more of these for holiday presents.

It has been a while...

So sorry to be gone for so long - my only excuse is that I have a 10 1/2 month old who is a girl on the go so my free time is very limited. Luckily, I have been able to get some sewing done and have even done a little guest blogging over at Fabricworm.

Here is a sample I made for the Tunic sewing class I am teaching in a couple of weeks.
And here is a little halter tunic I made from a free pattern on www.sewingpatterns.com. I blogged about it here.

I also wrote a post on how to make a messenger bag without a pattern here.

Sunday, August 08, 2010

Sweet Little Bear


I am doing some guest posts over at Fabricworm.com. This guy is my first project so if you have a chance, check it out.

Tuesday, July 06, 2010

Sewing Lessons!

I have been a big fan of Fabricworm and Birch Fabrics since Cynthia first started selling fabric two years ago. It made my move back to Cali even more exciting because Birch's brick and mortar store was only a couple of towns away from where I live. Getting to see all of the fabrics in person is pretty amazing.

I was up at Birch a couple of weeks ago and one thing led to another and I am now going to teach some sewing classes in Birch's gorgeous loft space! It is so exciting I can barely think of anything else.

The first two classes I am going to teach are how to sew a zippered, lined cosmetics bag and how to sew a basic patchwork quilt. I wanted to make some samples to have in the store as a way of advertising the classes. I suggested this to Cynthia and the next thing I know, we are cruising around the store putting together the cutest fabric combination for the sample quilt. Okay, it was mostly Cynthia and I just followed her around and tried not to geek out in excitement.

The quilt is 36" square made up of 6 fat quarters with an extra 1/4 yard of fabric for the binding and just over a yard of fabric for the back. I wanted to keep the pattern simple and something that would be easy enough for beginners but would also be a way to teach basic patchwork skills. I also kept the quilting simple by outlining both sides of the seams with a white thread. I love how the quilting adds just a little extra to the brown squares.

The fabrics are Monaluna Woodland Chain Pool, Michael Miller Dumb Dot Chocolate, Riley Blake Colorful Cheery Circles Green, Alexander Henry 2D Zoo Pool, SEI Playday Playful Geos Teal, and Robert Kaufman Pure Organic Chocolate.

And here is the back, Monaluna Woodland Chain Pool. The binding is Riley Blake Colorful Christmas Cheery Circles White.
Here is the sample of the zippered cosmetics bag. I used Alexander Henry's Bird Seed and lined it with some Amy Butler Full Moon Polka Dots. It is lined and has an interior pocket.

The classes start in August so if you live in the Central Coast of California and interested, shoot me an email.

The Never Ending WIP

I really don't like having unfinished projects. There is something about it just sitting there, unfinished and taunting me, that makes me feel anxious. Because of this, I usually try to finish things before starting new projects, but sometimes, I bite off more than I can chew.

So with that introduction, allow me to show you all 25 finished blocks I made after participating in a vintage sheet swap on Flikr. I started this right after I received the fat quarters from the swap in May and finally finally finally finished the blocks this afternoon. I am actively avoiding the fact that I now need to add white sashing to the top to finish it and am just enjoying the fact that the blocks are finished.

Here is a close up of one of the blocks. So much piecing but it was really an excellent exercise in precision sewing and patience. I was really careful and used my seam ripper a lot to make the seams line up.

I had two sheets, a blue floral and a pink floral, and used one in each block to create cohesion throughout the blocks.


And I am also considering sending it out to be quilted on a long arm machine. I know, scandalous!

Sunday, June 27, 2010

A Quilt for a Baby Nephew

A friend of mine recently became an aunt for the first time and I was more than happy to celebrate his arrival my making him a quilt.

This friend has commissioned many a quilt from me and we would normally go fabric shopping together to pick out the perfect combination. Now that we are on opposite sides of the country, we had to get a little bit more creative. We cruised fabric options online and then I sent her to check out fabrics in person at Purl Soho. She picked up four prints and mailed them to me. I then went to Birch Fabric and picked out two more prints. I rounded out the rest of the design with some prints from my stash.


Here is the back. The print is a subtle gray with yellow polka dots. It was hard to capture the colors though. You will just have to take my word on it.


And here is the quilt, lounging over the side of my deck.

Saturday, May 01, 2010

Quick Gifts; or How To Win Over Five Year Old Girls

I made these little presents for my friend to give as gifts to five year old girls. I don't know the girls personally so I had to guess on what they would like. The dolls came from The Black Apple pattern on Martha Stewart's website. They are so fun, easy and quick to make. I need to get some cute stocking fabric rather than using just plain muslin. I am also thinking about how to make little shoes for the next time around.

The faces are painted with fabric paint. They look okay from a distance but I could use some more practice.

I also made two little pencil cases as well. My friend lives in San Francisco so I am sending him to Japantown to buy fun pens, pencils, and stickers as the real treat. When I was little, I used to love little bags, pens and stickers so much. I am hoping the little girls will be excited to open up the bag and find all kinds of cool things to play with.


Please excuse the washed out picture above. I was hustling to get the pictures done before the post office closed.

Friday, April 16, 2010

A Flock of Triangles, AKA Wearing Out My Seam Ripper Quilt

Let me back up. I had the unfortunate experience of losing most of my creative energy as soon as I got pregnant. Maybe all that creativity went into making a super cute baby? Combining crazy morning sickness and a cross country move meant that I didn't end up doing a lot of sewing before my girl arrived. My husband and I did manage to pick out some fabric for her quilt, but it just sat in a pretty little stack for months and months. Of course, it didn't hurt that my girl had received some really gorgeous quilts from friends so she wasn't really lacking in the "handmade with love" department.

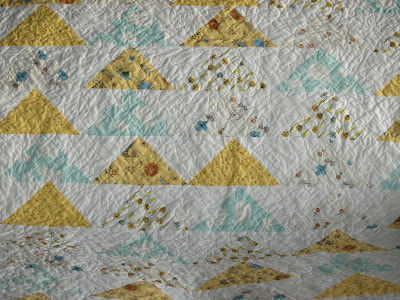
I was finally hit with the creative stick for her quilt and decided on trying Denyse Schmidt's Flock of Triangles pattern. Now don't get me wrong, what I am about to say about Ms. Schmidt has nothing to with her creative genius, but, boy did I have some serious trouble with this quilt. The instructions on how to line up the triangles to get them to create perfect points AND have a quarter inch seam allowance just weren't sufficient for me. I sent desperate emails to a quilting guru and ripped out miles of thread trying to make my triangles look decent. In the end, they were a hot mess. The lack of precision is pretty horrifying. I would have given up a long time ago but I had already cut the fabric so I didn't have much of choice if I didn't want to lose 5 fat quarters of cuteness.

Of course, I made some mistakes too. I used white muslin rather than a thicker fabric, like a Kona solid, and I suspect that added to the precision problems I was having. My rows would not line up no matter what I did. The best tip in the instructions was to line up the center triangles so if the rows were off, the pattern wouldn't be quite as skewed.

Here is the back - the lighting of the picture doesn't really show the pale blue color I used, but trust me, it is there and very cute.

I had wanted to try going some straight line quilting as well but with the rows being so messy, I ended up going with free motion quilting (I know! Shocking!). Free motion quilting hides so many sins.

There are a bunch of tutorials online for flying geese that I fully intend on trying again sometime in the future, once I have recovered from this experience and sufficiently blocked it out. The good news is that the quilt looks pretty good and the stippling really helped. Luckily my girl hasn't complained about it and in fact chose to roll over from her back to her front on it just last night. And nothing says acceptance and love like a major gross motor skill milestone!

Friday, April 09, 2010

A Quilt for Gus

One of my favorite crafty friends just gave birth to a sweet little boy named Gus. I was so excited to make him a quilt and decided to push myself out of my normal, go-to simple log cabin pattern. I recently started looking through some of my quilting books for inspiration and fell back in love with the Modern Quilt Workshop all over again.


This quilt was inspired by the book but I actually didn't follow the pattern because the pieces of fabric I wanted to use were not big enough for their techniques. Instead, I cut my pieces to be 2" wide and of varying widths. I sewed them together and then framed the smaller blue squares Kona Sky), which I think they were 4 1/2". The larger blue squares where 7 1/2". I used the string piecing technique for the small pieces of fabric and then again once again to join the finished squares. All in all, I am so happy with the way it turned out and am so proud of myself for pushing out of my quilting rut.

I also decided to get a little fancy with the back rather than my standard all white and pieced some blue and white together. I varied the widths of the blue pieces to make things interesting and my husband assured me that I did not inadvertently replicate the Greek flag.

And here is a close up of the blocks and the free motion quilting. I actually started quilting diagonal straight lines but I couldn't make the lines straight enough to not drive me insane. I tried using painter's tape as a guide but things went horribly wrong and I ended up ripping out 5 lines of quilting and going back to my happy place.

Monday, April 05, 2010

California Central Coast Modern Quilt Guild

As I am sure you have heard, there are modern quilt guilds popping up all over the place. Since the closest guild is an hour and a half from me, it seemed like a good idea to start one up in the Central Coast. If you live in the Central Coast and have an interest in modern quilting, check out the guild's new website. http://calicentralcoastmqg.ning.com/

Thursday, March 25, 2010

Cape Cod Wedding Quilt

A good friend of mine is getting married this summer on Cape Cod. When I got the news of her engagement, I immediately started thinking about making the happy couple a quilt for their gift. The colors are inspired by the sun, sand, sky and water - all the great colors of summer. The design is loosely inspired by two of Denyse Schmidt's quilts. I am so happy with the way it turned out - it really looks like summertime to me.

I used all Kona solids for the quilt, with a gray, sky blue, maze yellow and light green for the primary colors. I alternated darker shade of blue, gray and green for a little contrast. Man do I wish I kept it for myself.

Wednesday, February 17, 2010

I Have Been Busy, Just Not Blogging, Part 4

There is a baby boom going on and I am slowly working through my list of presents. This is a quilt for my friend who is due on March 1st with a little girl. I didn't mean to go so neutral with the color palette but I feel in love with owls and just had to make them the focus of the quilt. As the mother of a baby girl, I also know she is going to get a ton of pink stuff so I figured going with greens and yellows might be nice to add to the mix.


Tuesday, February 16, 2010

I Have Been Busy, Just Not Blogging, Part 3

I am lucky to have some really amazing and talented people in my life who made some really gorgeous things for my daughter. It allowed me to focus on making presents for other people since she has so many great blankets and quilts to use every day. It did make me feel a little guilty that I hadn't made anything for her, so when I saw that Denyse Schmidt posted a free Scottie Dog pattern, I immediately got to work on making the little girl a stuffed dog. Actually, I emailed the link to some crafty ladies first, then hustled upstairs during nap time and got to work.

The pattern is great and super easy to follow. My one piece of advice is to pay attention to her tips on how to handle sewing the side piece around the corners. It turns out that they are there for a reason and if you choose to ignore them like I did, the front and back won't match up and you will have to start all over.


I skipped the eyes and scarf since this is going to a baby, but I would definitely add them if the recipient was a bigger kid.

I Have Been Busy, Just Not Blogging, Part 2

I have seen some really great recovered footstools online lately and was busting to try it out. I didn't necessarily need a foot stool in my house so I contacted my very dear friend who have a deep love for designer fabric and worked out a deal. She sent me some extra fabric she had and I recovered a stool I won on ebay for her.

The stool was actually new, but it was the best option I could find at the time and was so easy to recover. I swapped out the fabric, added nail head trim and painted the frame in a high gloss white. For the most part, it was pretty easy, but that nail head trim is brutal on the hands.


It is getting sent off tomorrow to its new home and again, I am hoping for some good action shots (hint, hint)

I Have Been Busy, Just Not Blogging, Part 1

Thanks to my lovely daughter's great morning nap schedule, I have actually been able to get a lot of projects done over the past few weeks. The one thing I haven't had a chance to do is blog about them, until now.

The first of my projects is a long overdue housewarming present for a very dear friend who moved into her new home a year and a half ago. Rather than surprising her with something that wasn't something she really loved, I decided to spill the beans on the quilt plan and work with her on creating something that she would use and really enjoy.

And this is what we came up with:

It is another quilt based on the Purl Bee tutorial that I fell in love with a few weeks ago.

And here is the back, with some surpise improv blocks.
I can't wait for some action shots (hint, hint).

The Dining Room

Here is my dining room, with all six chair seats redone. I still want to paint the chairs but that can wait until I get a few more things checked off my To Do List.

Saturday, January 09, 2010

One Down, Five To Go

Moving from a tiny apartment to a real house meant that I would need a lot more furniture. I gave my wonderful in-laws a list of things we would need since they are masters of finding awesome deals. Before we even moved out, they scored us a dining room table and 6 chairs for our new house for a grand total of $45.

The table, which was a $5 score, needed a ton of TLC but thanks to my father-in-law, it looks fantastic. The chairs were snatched up for $40. The design is great and they were in pretty good shape but the vinyl seats were screaming to be redone. It took me 6 months of looking at the chairs and the decor in my dining room before I settled on brown and white striped fabric for the seats. I have found that the right choice for me will always present itself, I just need to be patient.

Here is the first chair that I re-did:


The seat cushions had to be completely redone with foam and dacron but the effort is totally worth it. You can see below that the brown vinyl left something to be desired both in aesthetics and in comfort.

The next step, after I finish the other five chairs, is to paint them white. My husband wasn't totally on board but he seems to be opening up to the idea. Once all the chairs are finished, I will post some room shots to show off the gorgeous table with the chairs that are now worthy enough to be paired with it.

Afternoon Delight

Ha ha - not that kind of afternoon delight. I mean that this is such a perfect afternoon project. The design is inspired by the Purl Bee tutorial. It is so easy to put together. The color scheme makes me think of summertime in New England and makes me want to cuddle underneath it on a cool evening on the Cape.

I had a tough time capturing the true colors of the quilt, which includes pale blue, pale yellow, unbleached muslin (used for the backing as well), medium blue, a yellow batik and a dark blue batik.


This quilt is already in the mail to keep some very good friends warm this winter.